Tuesday, December 30, 2014

Post Christmas Regroup

Whew, the rush to get too many things done before Christmas is over. Now it's time to access the damage to my craft room and what is still on 'The List' to finish or forget. But my fingers have been very busy and this is what I've done in the past two weeks. 

These are what I call mini memento journals. They are the same size and design as the other mini journals I've been making recently but they have some preprinted pages inside with vintage family photos. 


I carefully formatted a file with these little photos in a grid based on the cut page size for these journals . That was the hard part. Printing out the pages and putting together the journal was easy after that. These were all bound with a cross-stitch pattern and the paper was tea stained and torn to give it a soft aged look.


I also made a couple more mini journals and some little journals that are not as tiny as the mini's.


These Mini's (above) are 2" x 2" but the Little's (below) are 3.5" x 3".  These were all bound with a simple long-stitch because they have more than 3 signatures each.


After finishing the journals I made a couple more earth power bead strands. There are 36 different gemstone beads in each strand with pyrite, quartz and amazonite anchoring the ends. I also put the beads on in alphabetical order beginning with Aventurine and ending with Unakite.


There are still a couple unfinished projects on the work table that I do plan to finish over the holidays. Then I have to back up to whatever I was into back in September before the "holidays" started directing my efforts.  

Thanks for reading. Have a Happy New Year!
Aileen

Saturday, December 13, 2014

Beaded Snowflake Ornaments and Mini Gifts

Thanksgiving is over, the house is decorated for Christmas, most of the Christmas shopping is done, even some cookies have been made. That means it must be time to make some new ornaments and gifts. Nothing like getting motivated at the last minute to do projects I'd been planning for 12 months. 


I bought the wire snowflake forms these ornaments were made with last year! I did make one of the ornaments last year AFTER Christmas then moved on to do other things the rest of the year. This project has been waiting for me to get back to it for 12 months. These ornaments are a combination of 1950's vintage blown glass beads and new glass beads. 


And I'm still working on mini leather journals. This is the 5th one I've made and I went with fat and chunky and a simple long stitch binding this time. It also has tea stained hand torn pages of drawing paper. I learn something every time I make one of these.


Sunday, November 30, 2014

Saturday Summary, err Sunday

I've had a busy week. 

I finished two Christmas blocks I showed in  previous post. 


Both have been properly cat tested. 

I made two Christmas blankets from patchwork tops made from pre-printed Christmas storybook fabric with a piece of fleece for the backs. No quilting in theses simple Christmas throws. 


I did get a little side tracked on a scrappy project. Several years ago (~15) I read an article in a quilting magazine about 'mosaic' quilting, a method to use up various odd sizes of fabric scraps. I've done this several times when the piles of scraps grow and I want to organize 'the mess'.


I plan to border all the blocks in white (also leftover scraps) and combine them to make small quilt projects. Maybe place mats, potholders, pencil cases, or tabletop quilts.


But at least the annoying pile of scraps is gone. In it's place is a neat pile of scrappy squares. There is a difference. Really...  Now I can start making a new annoying pile of scraps! It never ends, the cycle > new project > pile of project scraps > new project from project scraps > next new project > and so on .....

Thanks for Reading.
Aileen


Thursday, November 20, 2014

No More Side Projects

Five weeks until Christmas! 35 days! That's nothing, no time at all, or not as much as you think, or I think. I've learned over the years that I always, Always, overestimate how much I can accomplish in a given amount of time. If I think I can get ten projects done in five weeks the reality will be that I get five projects done if I work really hard at it. Of course that doesn't mean I will ever shorten my todo list, I just view it more realistically. But I also tend to get sidetracked and end up doing projects that were not part of the plan. So from here on until Christmas, no more side projects and start working on my project list, highest priority first, because I know the items at the bottom of the list won't get done this year, probably. 

So today I plan to work on a couple small quilts I sewed this week. 

At least this one is with Christmas fabric. I got a mini-charm pack of Solstice by Kate Spain for Moda fabric and added some Christmas theme fabric I had on hand to make this little table quilt. 

This one has nothing to do with Christmas but is also from a charm pack of Elementary by Sweetwater for Moda fabrics. 

My next posts should be all about completed Christmas projects. Definitely. Maybe. 

Thanks for reading. 
Aileen 

Saturday, November 15, 2014

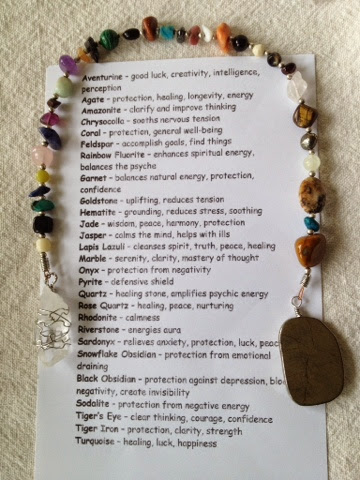
Earth Power Beads

I just made that up. I really don't know what to call them and if they have any power is up for debate. What I do know is I love semi-precious gemstone beads and many believe they possess energy and thus power to help in different ways. If you search "gemstone meanings" on the Internet you will find many sites with a wealth of information on the subject. That's what I did and then I condensed it into a list of just the meanings I felt were relevant for my purpose and for the gemstone beads I had available. 


I think I ended up with a condensed meanings list for 27 different beads. I didn't realize I had collected so many different types of gemstone beads. 

My purpose was to create a string of beads to put into a medicine bag as a gift. This first one I made has one bead of each gemstone and is anchored at the ends with pyrite and a quartz crystal. 


Pyrite provides protection and a defensive shield and quartz is a healing stone, so my research says. 'They' say everyone should have a quartz crystal and all the other stones I included have various types of other helpful energies. And I think they're pretty. 

Now that I have a energy reference list and a pile of beads, I could make bead strings focusing on specific energy needs by adding more of some beads and leaving out others. If I had a reason to. For now I'm going to make more Earth Power beads similar to this one and spread some good energy around.

Thanks for reading. 
Aileen 

A couple things I did this week

Another mini journal. 
This is the fourth so far and it's hard to see the difference in this photo but the paper in this one has been tea stained. I'm working on an idea for mini memento journals with old looking (tea stained) paper with aged photos printed on some of the pages. That's a story for another post. 

And Christmas dish towels. 
This is the Christmas project I've been working on for weeks now.  It is a dish towel (or four from one yard of printed fabric) I designed and had printed at Spoonflower. There is a much longer story here but suffice it to say I achieved what I set out to do, it just took more time and work than I thought it would. 

Thanks for reading. 
Aileen 

Mine, All Mine

Or so says Cassandra, who has decided that all new quilts in the house are hers!

"My cat quilt!"
Here she is cat testing the new cat print table quilt. 

"Oh, another quilt. Also mine."

"Don't bother me. Can't you see I'm having a cat nap!"

"Go away now, I'm sleeping with my new friends."


Monday, November 10, 2014

Purple Collage - Fabric, Paper, and Acrylic Paint

Several weeks ago, after I cut 4" squares from over 100 different purple fabrics, I started work on a collage project.  

First I made paper collages of the purple fabric scraps. 


Then I started on the background canvas. I'm using trash trim strips of fabrics saved from various quilting projects as a texture layer on the canvas. I use gesso or acrylic medium to 'glue' the fabric to the canvas.


After a texture layer of scrap fabrics has been added I start adding more paint to create a multi-shade abstract background for the pieces of purple collage that will go on last. 


There is really a lot of texture here. But I'm not done painting. I really don't want the colors of the bottom fabric layers to show, just the texture. 


I plan to add more color to this layer and the texture provides nooks and levels to fill in with different shades of purple and colors. 

But the ultimate goal is to add pieces from the purple fabric collage pages for the final composition. 


Here I'm auditioning a possible size and layout for the purple collage pieces. These are 1 1/2" square and the edges have been painted dark purple. The background will have more color than shown here but I plan to have it light enough to provide good contrast.  We'll see how it actually comes out!

Thanks for reading. 
Aileen

Black, White and Red Cat Quilt

After I finished the last cat quilt I decided to make the same pattern but with more contrast. I had some cute black and white cat fabric and added some other red, white and black prints. The high contrast really shows off the pattern better. 


This is the completed cat patchwork from my last post. It's the same pattern as above but not as obvious. 


I've considered sewing the rows in a more random staggered fashion. Each stacked row of cat face blocks is a pattern unit by itself. There is no reason why they have to be lined up exactly horizontally. It would be interesting to see a high contrast example with randomly lined up rows. I guess I'll add that to my 'Ideas to Try' list. 

Thanks for reading.
Aileen

Saturday, November 8, 2014

Simple Cat Face Tessellation Quilt

The Cat placemat I made for Halloween came out so well I decided to make another Table Quilt using the same pattern but with some cat themed fabric I've randomly picked up along the way. 

I've cut all the fabric pieces and put them up on the design wall to preview. Now I just have to sew the ear pieces to each block. This is the basic cat face layout. I'll sew the ears for each cat face on the square above it to make the pattern. 

These will be the cat ear triangles. 

These are the basic blocks used and the construction and layout. 


Sewing the rows of cats. 


I'll repeat this until done. 


Only a couple more rows to go. 
Very simple. Thanks for reading.