Friday, October 31, 2014

Patchwork Halloween Placemats

In the last two days I have managed to get four Halloween themed placemats pieced. I have ideas for a couple more and plenty of extra Halloween theme fabric to work with, but first I am going to machine quilt these and bind them. 

The first one I did was with the scary cat fabric. I looked up several cat patchwork patterns and ended up designing my own very simple cat face tessellation pattern using just two sizes of blocks, one 4 1/2"  square and two 2" squares for each cat face. 


Then I went with a simple checkerboard pattern for the black and white skulls fabric and some other assorted light and dark fabric. 


Finally I worked up the idea I had for a tombstones patchwork using some assorted grey and dark brown fabric I had on hand. Using a strip piecing method I sewed a tombstone dark light strip and cut it into random widths, added dark strips of fabric in between random height light tombstone blocks, and stacked them up in rows. 


I also planned to do a spiderweb like pieced block but I'm going to finish these four placemats first.

Wednesday, October 29, 2014

Halloween Deadline

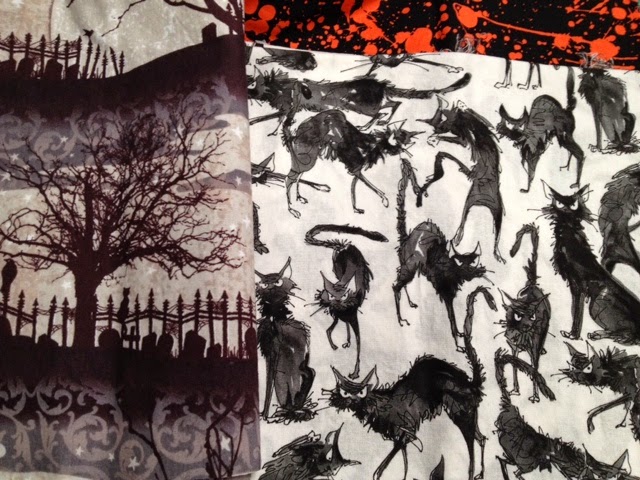
Talk about last minute projects. There's nothing like a looming deadline to motivate action. We'll see how much I actually get done in two days. I'm not trying to do too much, just a couple placemats. And I don't usually get into Halloween that much but I found some really cute grungy Halloween fabric (Eerie by BasicGrey) and had to have it (on sale of course), and the scraggly cat Sebastion from the Ghastlies fabric line was also a 'must have'. 


And I found some neat spooky cemetery fabric at JoAnn's fabric store (also on sale, there is a benefit to waiting until the last minute). I plan on using a solid piece of that for one side of a  reversible placemat and patchwork a tombstone design for the other side. I'll post the results, hopefully in two days!


With all this fabric I'll get ideas as I go along. Each placemat will be different, spiderwebs, skulls, cats, cemeteries, bats. Lots of creepy spooky stuff. Mwahahaha...

Monday, October 27, 2014

All Clear

Yay! I finally got all those miscellaneous projects off the wall. 


I ended up with seven completed quilt tops, which is one more than I started with. The problem is I can't stand having leftover quilt scraps hanging around. I'd rather sew them all together into something scrappy then leave them in a pile someplace. So I ended up with an extra 'leftovers' quilt from the trimmings of my on-point quilt experiment. Those two are shown below. 


Of the next four, two are also mini leftovers quilts. The green Christmas tree block (lower left) was an exercise in sewing 60 degree triangles. And the white with green vine block (upper right) is a test of painting on fabric. 


Most of these design wall orphans were leftovers or just little projects using up odd pieces of fabric or testing an idea. Only one was a drawn out and planned quilt top that got sidelined along the way. I'm very happy to finally have my Valentine quilt square sewn. 


And the puzzle heart block.


This one is small enough to be hand quilted and possibly embroidered in some way. 

Now I can move on to new projects. Next up, Halloween fabric. 

Saturday, October 25, 2014

Make Room on The Wall

Groan...  I have to clear off my design wall to make room for new exciting projects. Of course the projects up there now were new and exciting at some point in the past. And I left them up there determined to finish them because I get attached to them. I really do want to finish them. I have already migrated a few things off the wall. This is what's left. 


I just have to sit one day and sew. For quilt projects on the design wall I complete sewing the top. Then it goes in the cabinet on the 'to be finished' shelf. The quilt top has to be completely sewn to quality for that shelf. Otherwise it's just an unfinished quilt and goes someplace else. I have a couple of those. 

So I have multiple stages of 'doneness':
Genesis - idea, sketched, designed, fabric picked out. 
Unfinished - cut pieces or most pieces cut, maybe some blocks sewn. May or may not be on the design wall. 
Top Complete - the quilt top has been sewn and put away. 
Ready to quilt - top, batting and back are basted and ready to quilt. 
Partially quilted - quilting design decided on, thread picked out, quilting has been started. I do this by hand. 
Ready to bind - Quilts done generally don't get stuck here for very long. Once the quilting is done all I want to do is finish. 
Complete/Waiting for embellishment - This is a special category for wall hangings or art quilts. The actual quilt piece is complete but I have embroidery or beading I plan to add.

Now I want to make room for the Star Trek quilt, some Halloween placemats and Christmas fabric projects. 

I actually have another category. 
Completed - Quilts I've made but don't have a use for. They are brand new, never used, stored and waiting to be given away. 

Monday, October 20, 2014

Status Update - Leather Projects

Ok, this is an experiment. Because I apparently find writing a complete blog post painfully restricting and seemingly impossible to complete. I am going to attempt the 'status update' format of Facebook or Google+  for my blog entries. No one reads the long posts anyway, right, if they read anything at all.  It's all about the photos and less than 140 words in today's world. So I am going to write more frequent, but shorter and less 'informative' posts. 

In the last week I've been working with leather. 
I made two miniature leather journals and a medicine bag. 


The leather is all from inexpensive bags of scraps you can buy by the pound. I've never worked in leather before. It's rather tough to sew. You need special needles and thread and tools like a leather punch and a very sharp stanly knife. But it smells sooo good.

I have plans for more journals and bags and possibly jewelry pieces or embellishments. 

Monday, October 13, 2014

Multitasking Projects

When I was working in my profession, multitasking was an essential skill for success. While working with dozens of technical professionals across multiple projects with several different computer systems, operating systems, programming languages and systems to contend with, multitasking was the only constant. It's what I've always done. It's what I still do. Even though now I am spending most of my time on hobby activities I will switch between multiple projects in any given day. From the outside it may look unfocused and haphazard but I make forward progress in most things over time. My craft spaces are well organized and I can switch between projects easily and it works out well because I can accomplish more than one thing at a time, there is no wasted time. For example, some artwork and collage work required breaks in time to allow for drying or pressing.  I can sew or work on digital art during those breaks. I also get tired hunched over a sewing machine too long or my hands hurt after hand quilting too long or I get tired standing over my art table too long. Switching from one task to another let's me keep working on projects but allows me to choose what I feel up to doing that day or hour. 

The downside is that when I try to write a post about what I have been doing it is always about multiple things. Because that is what I have been doing in a week, heck even in a day. But the secondary upside is it is more like cross training. Work I do in designing quilts may give me an idea for a collage, a collage may end up as a book cover, bookbinding may spark an idea for Fabric design or a quilted piece may end up as a book cover.

This is my current round up of activities:

A new indigo butterfly fabric repeat print. I created new flower shapes in the ArtRage app on my iPad, pulled all the elements in a little tighter, filled the blank space more with flower elements and increased the number of butterflies. I like this one and it has given me ideas for using other iPad apps to create the basic elements of another fabric design. 


My first little book and what am I doing wrong? It's still cute. Everyone who sees it likes it. But there is a problem. See the little ribbon. I didn't plan on putting that on the book. I had to add it to hold the little book closed. It kept popping open. I put it under heavy weight for a day, even hammered the bound edge some, but the top cover keeps popping up. I don't know if it's my binding technique, the weight of the binding string I used, the size of the signatures, or something else. So I decided to do a few experiments to eliminate possibilities. First I rebound it with different size string.  What you see here is the second binding. That helped some but didn't solve the problem. Rather than remake this one a dozen times I made several little books with simple cardboard covers varying the signature page count and string size. This is just one of many I've made and I still have not completely resolved the problem but the smaller the string size I use the less the problem becomes. 


This is terrible, I took it apart and did it over.

 This is better but still popping up some.

 Finally, this one is lying almost flat.


 The next set of little books are even smaller.


Purple scraps collage. Remember that pile of scraps from a previous post? Well, this is the beginning of something.  I still don't know what yet but these are some initial collages of some of the scraps I saved and they are sure to be scanned and then cut up and used some other way.


Digital Collage of Fabric and Paper Collages


Tarot card bags. One crochet with a cotton and silk blend yarn and  the second is a scrap patchwork bag that is lightly padded.

 Front and back.


Color test fabric and new geometric pattern. More color testing of Spoonflower cotton fabric and I'm working on a design for a multicolor geometric print.

One yard multicolor test print.
 

 My favorite colors and what I'm working on a design for.

Color codes.


Thursday, October 2, 2014

Handmade Books

A few years ago I decided to learn how to coptic stitch bind my own blank books.  I had recently purchased a beautiful coptic bound journal with stiff leather covers and it was a rare find. I like the look of the exposed binding. I love how coptic bound books lay completely flat when open. I wanted more but choices were few and far between or too expensive for my budget. so of course I thought, "I can do this myself".  And that is basically true but achieving the high standard I appreciated when I see these books takes practice and quality materials.  Well, I have lots to practice on but quality materials will come later when I've practiced enough. 

I recently finished a number of coptic bound 'practice' books and a couple other books.
This is what I have been doing:  


Other Non-coptic books I finally finished.
Denim fabric covered booklets with colorful painted pages:


In the process for cutting paper to size for the coptic books I ended up with a large stack of accurately cut mini sheets of paper. Something most people might throw away. But what I see is paper for tiny books. I have plans for this paper.

Plans for Mini Books:

2" x 4" sheets and 1 1/2" x 3" sheets


2" x 2" book in progress

Check back later to see the Mini Books completed! They are so cute.


Buried under Purple Choices

I have over 100 different purple fabrics in my collection. I had a plan, many many years ago, to make a purple quilt for my Mom. I decided on a design, bought light purple/lavender fabric as the background and began collecting purple prints for the main design elements. 


The Overlapping Purple Print Design Plan

That was so long ago. I never got that quilt made. My Mom died years ago. But I still have all this fabric and just recently it has been on my mind. With all the other projects I have on my plate right now I don't know why this has come to mind. I don't know why I feel compelled to look at this again after all these years. It's beyond my comprehension. But I'm going along with it and to see where this goes. 

I decided I wasn't going to make the quilt I designed for my Mom but I've gone through every single piece of purple fabric I have and cut one 4 1/2" square from each print. It's been an interesting journey, looking at each one of these pieces of fabric and trying to remember why I have it and where I got it. I know I've had some of this fabric for over 20 years. Some if it seems ugly to me now and I can't imagine ever having bought it. Some if it I can't renumber at all and probably got it when I was subscribed to a monthly fat quarter club. But that was a choice also. I choose to blindly get fabric sent to me every month even when I didn't like a lot of it. But some of the fabric I love and clearly remember where and when I got it. 


At this point I'm playing with design ideas. I think I will at least sew a quilt top. It may never be finished beyond that. I have several unfinished tops because that's the part I like to do. But I haven't decided if I am just going to make it with only one square of each fabric or go ahead and cut more squares. 

Quilt size calculations and new design ideas.
One square of each print could easily be fashioned into a lap quilt or a larger wall hanging. I have enough fabric, if I repeat prints, to go to any size larger I want. But I don't need another bed size quilt and there is a better chance I will actually finish it if I keep it small. 

And now I have this huge pile of trim scraps! Normally it would all just go in the trash but since I've started doing collage art and mixed media, a pile of what used to be trash now looks like a pile of opportunity to me. There are a number of things I can think of to do with this "trash" including collage elements or fabric beads.

 
The purple trims trash piles.


You see here some of the trimmings already stiffened with a mat acrylic medium wash laid out on freezer paper to dry. It's a very easy way to make fabric usable like a paper, stiff enough to cut small shapes with no fraying but still pliable. I do this first when I plan to use fabric as a collage element.

So besides one or more purple quilts to add to my project To Do list, I'll also probably do 'something' with the scraps. I may end up doing that first. Art and collage is so much easier than sitting and sewing for hours and I have a whole lot more wall space for art than beds to put yet another quilt on.